Showing posts with label Custom. Show all posts

Monday, May 3, 2010

April Photo Contest Winner

It was so hard to chose the winner for this month's photo contest! Thank you to all who submitted your photos. The winner is Teresa from Manteno, Illinois, and she is getting $50 to spend at Wall Written!
"I thought I would send you a photo of the decal. It looks really nice, thank you so much! I look forward to doing business with you in the future."
-Teresa, Manteno, Illinois

If you look at the photo, you might have noticed the added color customization: The design we offer online only comes in one color, but she wanted to have two colors. I think it turned out very cute. (If you want special customization like that, just call us before you place your order, and we can give you a price quote.)

Sunday, April 11, 2010

Customer Photo Followup

A couple weeks ago I blogged about a custom monogram I had designed:
Today the customer posted this photo to our facebook page.
"We finally finished putting up our Family Name wall art and we LOVE IT! You guys did a great job of designing for us. Thanks so much. We ended up painting a decorative square underneath it for a little more color in the room and finished it with painted moulding."
-Misty, Oklahoma City, OK

Isn't that rad? So this design is still applied directly to the wall, but I think they really set it off in a super creative way! I have to say, I love it, too.

Tuesday, April 6, 2010

Customer Letter

Today we got an email from a customer who had made a custom statement, but needed a little extra help with the sizing. She ordered this design in Split Pea:"Just wanted to let you know that my recent purchase of your wall art was a big hit. My daughter put it on her daughter's bedroom wall and she loves it! It is so cute and so original. Thank you for your help in making the design and size. All looks great!"
Pat - Weaverville, NC

Thank you for the note, Pat! I'm always wondering what our designs end up being used for- and I seriously adore getting letters like this.

Friday, April 2, 2010

How to Create Established Date Monogram

For this design above- I used our new Damask (Headboard Length) Monogram (shown in size: 36" x 11"). Then I opened the Custom Design Tool. The first thing I did was click the button in the lower left side of the tool labeled: Background.

Change the background size to match the width of the space you're putting your design. In this case, I'm trying to fit the established date and last name to the monogram, so I'll change the width to be the same as the monogram size I chose. (36").

You can also chose the color of the wall where you'll apply your design, but keep in mind that the color you chose is just a visual tool to give you an idea of the colors - there is not a background included with the design.

Next, select the words "Make Your Statement Here", and type in the text you want to be directly below the monogram. In my case, I typed in "e s t a b l i s h e d 2 0 0 4" (note the spaces between each character - this is not required, and would not work at all with a script-type font). Then I chose the font by clicking another button on the lower left side of the tool labeled: Font
We chose the font "Mrs Eaves Small Caps" to match the monogram.
The next step is to choose your size. Just pick whatever size you need to make your letters fit in the white part of the screen. (I even gave myself a couple of inches on either side, because I wanted this part to be slightly smaller than the monogram itself.) You can see how many inches the lettering will be by comparing the words to the rule bars on the top and left side of the tool.
Because I wanted the last name portion of my design to be larger than the established date, I need to make a new layer. Find the button on the lower left corner of the tool.
Now you need to click on the new layer that was created, select the text (Make Your Statement Here), and type the last name portion.
Then follow the steps above for changing the font (Mrs Eaves Caps is what we used again), and choose the size for the second layer.
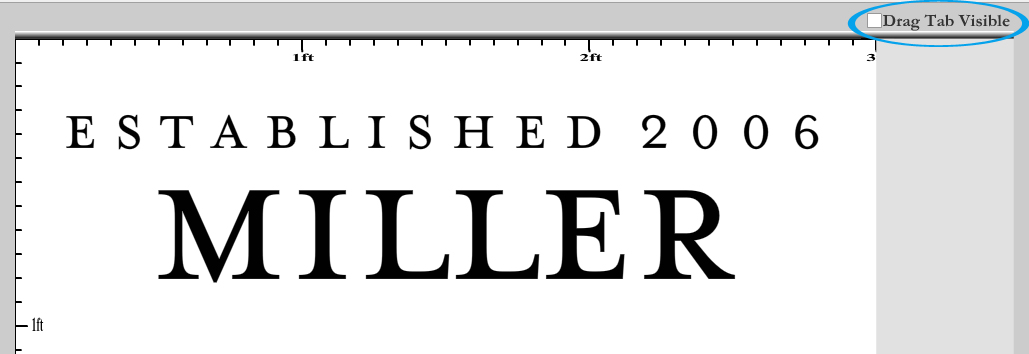
Since the drag tabs above each layer that let you position the layers may block your view, you can simply un-check the box in the upper right corner of the design labeled: Drag Tab Visible. (Just be sure to recheck it if you want to move anything around). To make changes to a specific layer, just click on the layer you'd like to modify.
You can see the price in the lower right corner of the Design Tool, as well as the "Add to Cart" button.
After your design is in your cart, don't worry if the layers aren't displayed in the order that you made them; each layer will come on it's own piece, and you'll be able to position them however you'd like.

These same concepts can be applied to our Field of Flowers design.
First choose the size for the Field of Flowers, then input the width to match (give or take a couple of inches, if you'd like). Then just make the name look the way you want, and choose the same color as you did for Part 2 in the Field of Flowers design (the color of the flowers).

Good luck, and Happy Designing!

Thursday, April 1, 2010

New Fonts in the Custom Design Tool!

We have just added some great new fonts to our Custom Design Tool! I've underlined my favorites fonts below. (Although it was hard to decide - there were several that I love but didn't underline.)
Many of them were fonts we'd had available before, but not in the tool - so there are lots of PreDesigned Statements made with them. Here are some examples of Designs that can now be made with the fonts in the Design Tool:
So go nuts! We'd love to see all the stunning designs you can come up with. If you'd like to learn more about making your words into works of art, check out our Custom Design Tips page.

Monday, March 29, 2010

Great New Customer Photo

One of our customers recently designed a custom quote using our Design Tool with lyrics from the song: Does Anybody Really Know What Time It Is by Chicago. She was putting it on the wall above the landing on her stairway, along with several different clocks. Then she sent us this awesome photo and a sweet note:

"Thank YOU! You were a big help Emily. Just so you know, I have been using a different company for several years and have done a good bit of business with them. My customer service experience this last go around, was terrible. I contacted them first about my “clock wall” because I always use them. The uninterested response I got made me look elsewhere. You now have my business! I have passed your information on to several of my friends and I think my daughter will be contacting you soon.
Good luck in your business Emily, and remember, GREAT customer service does in fact make ALL the difference :) You were a sweetheart."
Robin, Anchorage Alaska

What kind things to say! Thank you, Robin- and I love your clock wall.

Sunday, March 28, 2010

Custom Children's Monograms

I've been working on a new Monogram style, but it's the kind of thing that really needs to be laid out specifically for the name that will go inside it. While I was monkeying around with it, a customer emailed in asking for something very similar for her two kids, Finley and Kannan. We sent her the choices below. Another option would be to have the main initial to be in the center, with the complete first name as an overlay. I love the little flower on the girl's "F", but we could change that to be a bird, a butterfly, or even leave it off.
If you want us to design something like this for you, just be sure to have the colors and size that you need, as well as the name and overall layout. Then just send it all in an email and we'll get crackin' on your font choices.

Saturday, March 27, 2010

Most Creative Customer of the Month

So a while back, a customer requested this special design for her "Guitar Hero" themed teenager's bedroom. The one she ordered was enormous (over 8 feet long) - and I haven't been able to get it off my mind. (I really, really hope she sends in a picture.) So, to vent off some of my excitement, I decided to offer it on our website.
Confession: I recently started playing Band Hero. Could that explain my fascination with this design? Perhaps.

Friday, March 26, 2010

One Design Concept, Three Ways

In the space of three days, I had two customers ask for very similar designs. They both wanted circle monograms with a last name and "Established Date" incorporated into the layout- as well as an accent letter in the background.
After listening to a clear list of specifications, I made several proofs showing this design, as well as several different choices for the red accent "S" in the background. This was the design she chose in the end- and I loved it, too!
For the Leavitt family, she wasn't quite as specific, so I made a few extra design examples. I ended up really falling in love with several of them, particularly this version.
In the end, she chose the last design. I think she made a great choice, and I know she'll be really happy with it.
If you want us to design a special monogram for you, be as specific as possible- it makes the process go faster and smoother. (Do you want the text around the circle to be wrapped around -all facing the middle- or have the bottom half "Right Side Up" so it can be read without twisting your head? What exactly should the text be, and where? Are there any fonts you're partial to? What color(s) will you need? What size?) Using this information, we can come up with a few choices in a relatively short amount of time.